Wednesday, November 28, 2012

1 Chicken, 4 Easy Meals- Part 1: The Roast Chicken

I Hope everyone had a happy Thanksgiving!  I know I certainly did.  :)


A few weeks ago I was watching one of my favorite shows on the Food Network, Barefoot Contessa, and the episode was all about roasting chicken.

I decided I had to have one!

And while doing my meal planning for the next week I started wondering how many meals I could make from one roast chicken?  I think 4.

The first is of course the roasting of the chicken.  
I used Ina Garten's video from the Food Network YouTube channel

I just love her!

I used one 5 lb free-range, vegetarian-fed, no-antibiotic, cage-free chicken.  It cost about 2x as much as the other Tyson brand chickens at the store, but for me, its worth it to spend a little more.

In fact, it was 7.10 for the ethical chicken and the same price for a 2-pack of un-ethical Tyson chicken.

A great thing about her recipe is that she uses fennel and fresh thyme, these ingredients taste amazing together!  Plus its fun to try new ingredients from time to time.  If you dont want to use these, you really dont have to.  You could replace the fennel with a diced potato or two.  

If you decide to go with the fennel, it may be labeled at your grocery store as anise.

Pre-roasting

Roasted


YUM!

We split one of the breasts and the vegetables for meal one.  It was awesome!

After removing all of the meat, I used the carcass(and stuffing), along with the remaining 1/2 of an onion, 1/2 the stalks of the fennel/anise plant, and the top few inches and leafy tops of 1 bunch of celery to make stock for future meals.

I also removed the meat from the thigh pieces and put the remaining bones and fatty bits into the broth.
Fill pot with fresh water until contents are just covered and simmer for 3-4 hours. (till it tastes like broth)
Add salt.
Refrigerate.


The leftover breast and legs went in one container, drippings from the roasting pan into another, and bits of meat from the thighs and carcass into a third.

Lots of food stored away for future meals!


Monday, November 12, 2012

Moroccan Butternut Squash and Chicken Curry


Holy snow-storm Batman!  This recipe was inspired by my need for something healthy and comforting on this:
Snowy-SNOW day!

At the risk of sounding narcissistic I'll say that these pictures really dont do this recipe justice.  It is seriously delicious!  What I love about it is that its really very comforting and homey while using flavors that are unique and out of the ordinary.

Moroccan Butternut Squash and Chicken Curry

About 3 cups (about 1/2 of a large)diced butternut squash
1 can Garbanzo Beans, rinsed and drained
1 can Petite Diced Tomatoes
1/2 cup Chicken Broth
1 cup Diced Onion
1/2 cup Golden Raisins
1 tsp (or one clove) Minced Garlic
3 Tbsp Brown Sugar
1 Tbsp McCormick Moroccan Seasoning
4 Chicken Tenderloins or 2 Chicken Breasts Halved
1 Tsp Sea Salt
1/2 Tsp Black Pepper


Combine all ingredients in crock-pot, lay chicken on top, and cook on low for 6 hours (8 if chicken is frozen) or high for 3 to 4.


Once you smell this Moroccan Seasoning, your nose will know exactly what we are up to.

For those of you who have a hard time with the knife.  Let me save you from yourself.  Leave the veggie peeler out of this.  Here's the easiest way to cut up these big ole butternut squash:


Ingredients. 


 Mix.


Adorn with chicken.  Sprinkle with salt.


Serve over rice.  We used wild rice/lentil mix.  

Devour.


Thursday, November 8, 2012

Cilantro Salsa Vegetable Soup


I have to give credit to my brilliant friend, Tiffany, for teaching me about this recipe.  I've changed it a little since we first made it but boy-oh-boy is it good!

I decided to make a blog post about it because my mother said my other recipe's are too time consuming.  

Before the recipe there are a few things regarding the ingredients that I need to clear up.  

1.  This stuff:

IS  


In soups.

2.  These four ingredients:
 Make food taste good.  The sweetness of the carrot, the crisp green flavor from the celery, the rustic earthy onion, and flavorful aromatic garlic.  When added to just a few other things they make magic!

For the Salsa Vegetable Soup I added some diced tomatos, cauliflower, cilantro, broth/bouillon, and El Pato salsa.
BAM! Soup!


Cilantro Salsa Vegetable Soup

2 cups chopped carrots
2 cups chopped celery
2 cups chopped cauliflower
1 cup chopped onion
1 cup chopped cilantro
2 tsp chopped garlic
1 can diced tomatoes
1 can El Pato Jalapeño Salsa (or 1/2 can for mild) 
2 bullion cubes and 4 cups water OR 4 cups broth
(chicken, tomato, cilantro, or vegetable works)

*Optional* - 4chicken winglets OR 1 large chicken breast, chopped

Put all ingredients into the crock pot, minus 1/4 cup of cilantro, and cook for 3 hours on high or 6 hours on low.  Use remaining cilantro as a garnish or mixed in after cooking for added cilantro-iness.

 Chopping cilantro...

Pre-cooking.


Trust me, this soup is unbelievable with a few grilled corn tortillas on a cool day.


Wednesday, November 7, 2012

The No Tears, Lightning-Fast, Guide to Chopping Onions


So fast you dont even have time to cry.

Unless you need a good cry.  Then go ahead and let it out.


As soon as you are done, rinse your knife and cutting board and keep those onions away from your face!  

Ever since I started chopping my onions this way, I havent shed a tear! 

Tuesday, November 6, 2012

Acorn Squash with Flax and Goat Cheese Filling

Acorn Squash Stuffed with Flax and Goat Cheese


Cooking with Flax Seed
This is my first try cooking with flax seed.  I must say I am pretty pleased with how it turned out.  Apparently flax is some kind of delicious super food so this recipe pleases my tummy AND my mind.

The word on the streets says flaxseed is full of omega-3 fatty acids, lignans, antioxidants and fiber.  However, in order for our bodies to get the most out of these fabulous little seeds, they need to be ground.  You can either purchase stone ground flax OR grind it yourself.  I took the second option and put my flaxseeds through a few pulses of my coffee-grinder turned spice-grinder.

To use my flax I thought, where better to hide these babies than in the plethora of squash that have recently invaded the gardens, grocery stores and local farmers markets like an angry swarm of bees?


Acorn Squash Stuffed with Flax and Goat Cheese


2 Acorn Squash
1/2 cup ground flaxseed
1 cup chopped spinach
1/4 cup chopped parsley
1/3 cup chopped onion
1/3 cup diced red bell pepper
1/3 cup crumbled feta cheese
1 tsp or one clove chopped garlic
1/2 tsp dry basil
1/2 tsp dry oregano
1/2 tsp salt
1/4 tsp black pepper
3/4 cup filler of cooked rice, couscous or quinoa
1 egg
5 tbsp olive, safflower, or peanut oil

*Optional topping - 1 tbsp parmesan cheese + 2 tbsp italian breadcrumbs*


To begin preheat oven to 400º and thoroughly wash the squash.

Cut the squash in half 'hot dog' style and scoop out the seeds.


Place the squash halves in a baking dish, cut side up, with 1/4 inch of water in the bottom of the pan.  Brush the top and inside of the squash with olive oil and sprinkle with salt and pepper.
Bake until the flesh is tender when prodded with a fork and remove from the oven.

--MEANWHILE--

Make the stuffing!
Start with the ground flax seed.  It should look like this:

Next add the spinach, chopped parsley, chopped onion, diced red bell pepper, crumbled feta cheese, chopped garlic, dry basil, dry oregano, 1/2 tsp salt, and
1/4 tsp black pepper.

Mix up the ingredients and put the whole bowl into the microwave for 1 minute.
Mix again.

!!!SPOILER ALERT!!!
...It will smell amazing...

If the spinach has wilted and your ingredients look like this:
Then you are all set.  If not, then you may need to microwave it for one more minute to get the spinach fully wilted.

Mix in the filler.  I used couscous because that's what I had leftover in my fridge.  If you have cooked rice or cooked quinoa, those would also work just fine!

In a separate bowl whisk up one egg and 4 tbsp oil.  

Pour the oil and egg mixture over your stuffing and stir till combined.

Now you are ready to fill the squash!


*Optional topping - 1 tbsp parmesan cheese + 2 tbsp italian breadcrumbs*
This delicious topping gives the squash a nice crunch and lovely salty spiced flavor.  If you are dieting, then you may want to skip this step.

Make sure that the pan you are baking your squash in still has 1/4 inch of water in the bottom and return the pan to the oven.  Cook for an additional 20-30 minutes or until the internal temperature of the filling reaches 155º.


Enjoy!

Monday, November 5, 2012

I <3 fall


Ferris Buellers Day Off is one of my all time favorite movies.  And Ferris is absolutely correct.

So today, I'm taking a page out of Elvis' book (the dog, not the King)
And making myself a cup of tea, putting some soup in the crock-pot, and sitting in the sun with a good book.

Enjoy your day.
<3

Sunday, November 4, 2012

Rustic Braised Pork Shoulder with Apples

Its C-O-L-D outside!  Well, actually its pretty nice today.  But the wind is blowing, and the leaves are all nearly gone from my trees!  This distresses me.  Comfort food to the rescue!!

I discovered a recipe similar to this a few years ago in the Martha Stewart Living Magazine, I have made some changes over the years, making it my own, and its become one of our favorite fall time meals.


Here's what you will need:

1 & 1/2-3 lb pork shoulder or 'butt'
3 slices of bacon
1/2 of a medium onion, diced
1/2 medium/large apple (any kind works)
1 & 1/2 tbsp brown sugar
2 tsp fennel seed
2 tsp coriander seed
salt & pepper
1 & 1/2 cups wheat beer 

[Here I used a seasonal beer.  If you are uncomfortable using alcohol for cooking, you can use a non-alcoholic apple beer.  It is VERY delicious!  A ginger ale would also work.]


First things first!  Chop up the bacon strips into little pieces and give the pork shoulder a generous rub down of salt and pepper.

[For the next step, I highly recommend you break out a cast iron skillet.  Other kinds of pans loose their heat much quicker and therefore are not as good for giving large hunks of meat the good quick sear we are looking for when we braise.  If you dont have one, buy one soon!  Put it on your Christmas list or something!!  They are a little pricey, mine was 20$(so not that much really), but its worth it because they last your whole life if you take care of them.]


Get your skillet nice and hot and throw in those bacon bits!

This is about the time when all the boys come to investigate. 


While you are busy trying to fend off the hordes of bacon-hungry men with your spatula, try to focus!  Put the coriander and fennel seeds into a pan on medium heat and get them a toastin'.  It should only take about 5 minutes, but when you can smell the sweet and licorice aromas take them off the heat and let them cool.


As soon as the bacon is crispy, use a slotted spoon to scoop the bits out of the frying pan and into the... crock-pot.  Drain out the majority of the bacon grease into a clean can or cup. Leave about a tbsp (just eyeball it!) in the pan for the next step and throw in the onion.

The onions should act like little sponges, soaking up all the leftover bacon-y goodness.  


......MEANWHILE.....

Your toasted spices should be cooled enough.  You will need to grind them up somehow.  I use this nifty little coffee grinder turned spice grinder.  It works great!!  (Thank you Grandma!) In the past I've used a blender or a Magic Bullet, those also work well.
Use 3/4 of the ground spices as a rub on the pork shoulder.  Give it a good rub down, he deserves it.


Just as soon as those onions start to brown just a little, give them the same treatment as the bacon and throw them in the crock-pot.  At this point you should add a little of that bacon grease back to the pan and turn the heat up.  As soon as your pan is smoking-hot turn it back down just a little to medium-high.
Now you are ready to rock!  Sear the pork shoulder fat-side-up for 2-3 minutes or until it reaches a dark brown, then flip it.  Remember, we are trying to cook only the very outside layer of the meat to seal in the moisture for the rest of the cooking process.  This will also give your pork an amazing flavor in addition to the buttery texture.

While that sears, prepare the crock pot by adding 1/4 of the apple-thinly sliced, the remaining (about 1 tsp) spice misture, 1/2 tsp of salt, and the brown sugar to the onion and bacon.


Once the pork shoulder has been braised on all sides, remove it from the frying pan and place it into the crock pot.

Now, turn down the heat, stand back, be brave, and pour the 1 & 1/3 cup beer (or other liquid) into the frying pan.  Stir frequently while scraping the bottom of the pan.  Allow that to simmer for 2 minutes and then pour the remaining liquid into the crock pot.
[This is a technique used by the pro's called deglazing.  Usually used for making sauces, it is a process in which the liquid will dissolve and absorb the flavors and burnt bits of what was previously cooked in the pan.  =YUM]


The larger your roast is, the longer this will take.  Mine was 1.5 lbs and it took 3 hours.  Worth it!

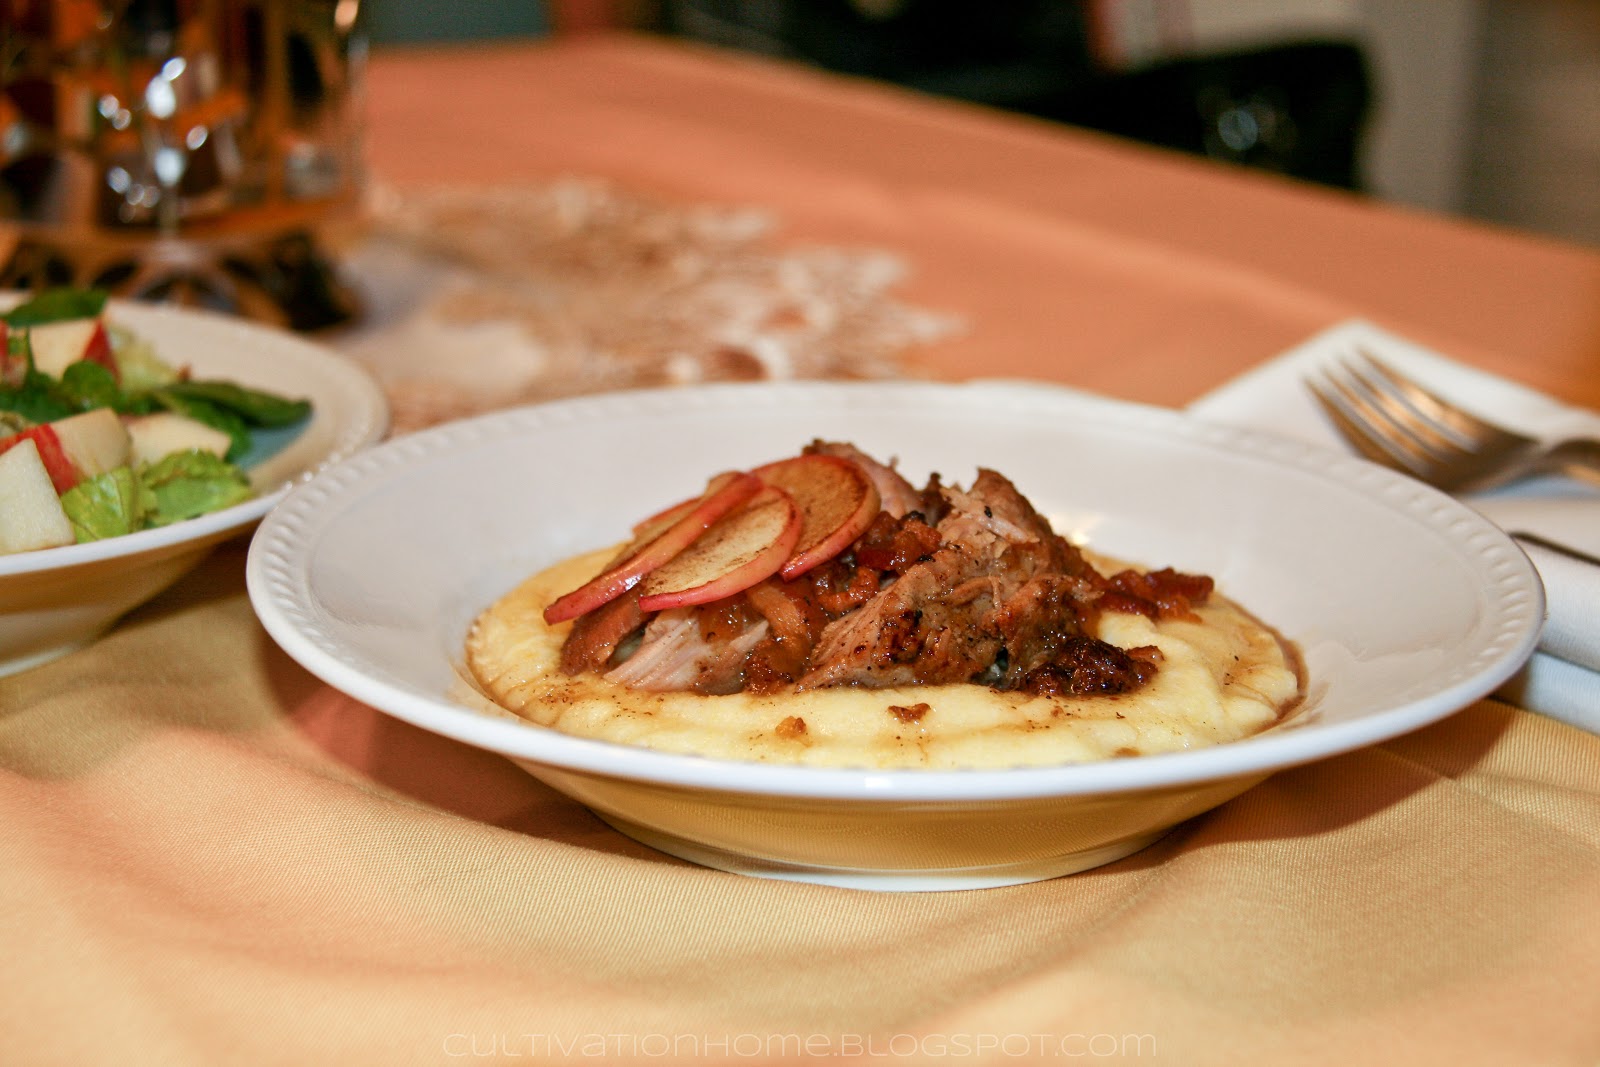
I served my braised pork shoulder over creamy parmesan polenta(recipe coming soon) and garnished it with slices from the remaining apple, sprinkled with salt and sautéed in the tiniest amount of butter for 3-4 minutes.  And OF COURSE a salad too!

If polenta isn't your thing(you probably havent tried it), this would also go well with mashed potatoes, rice, or on a sandwich!


Thank you for reading!  I hope you like it, please comment if you try it and let me know what you think!